So I started this blog as a place to cronical us finding, building, creating and making our dream house. Sadly things don't always go as planned. We do have a beautiful home and a project list a mile long. The thing about new construction however is there is this thing called a yard. In our first home we loved our little backyard we redid right before moving and it was perfect and wonderful and that was in the plans for our new house. The part that wasn't planed for were the imperfections. I've almost written about this quite a few times, but the short of it is... after getting our yard in (about 80%, we still have our patio to do which was to be done this year) we loved it and it was everything we could hope for. Until one day we started to notice water pooling in our window wells. Through a tough long winter of constantly pumping water out of window wells and cleaning up the floor in our basement, we knew that 2016 summer would NOT be patio..... it would be repair! :'(
Sadly it was a blame game between the builder and the landscaper so it came out of our pocket,
Showing posts with label Yard. Show all posts
Showing posts with label Yard. Show all posts
Saturday, July 23, 2016

Thursday, June 25, 2015
Full: Landscaping part 5: Decor
Rocking Chairs: I did a whole post about them back a few weeks ago.

Basketball Hoop: Ever since my hubby was a kid he has loved basketball. Coming from a cute little 5ft 10 in kid his dream lives in a back yard. So for an early birthday present we got this baby!
We decided to install it our self's. Which required a 4 ft deep hole by 24in x 24 in and 21 bags 60 lbs of concrete. It was an experience for sure! Not one I ever want to repeat but so happy to have it!!

Last fall Ewan turned 2! He LOVES to be outside so my sister in law helped me find this cute little play house. As much as I don't really care about gender spicific stuff, I thought it would be fun for him to have a house that matches mom and dads. However Liam put the input in for the Red Door!
The paint has NOT held up well, but the boys dont seem to mind.

TIKI

Patio from back porch

Patio from back porch angle 2

Garden with mulch

Garden with mulch

Mothers day Japaneses Maple

Back property Line

Back of house, plants need to grow a bit!


Front with mulch!
Money Breakdown
Tiki Torches: (6) Brought from old house ($120), purchased 1 tiki 2 small and 1 table top ($35): --$155
Rocking Chairs: $176
Basket Ball Hoop: Mammoth $1060.00, Concrete $60, other tools $40: --1160.00
Kids House: Gift : Spray Paint: $100
Fire Pit: Already owned
Rock Flower beds & Weed Killer: $100Hose Holders : 2@ $30-- $60
Hose's: 3 100 ft @ 30 1 50ft @ 20 --$110
Landscape Lights 5 @ $1.50 $10
Back Patio furniture Already owned
Patio Box; Clearance at HD during the winter: $40
Mulch: $50
All things done: Out of pocket Aprox $2,000
Running Total: $11,068.00
---Landscaping: $8,040.00
---Plants and Flowers: $550.00
---Garden : $378.00
---Drip Sprinkler: $100
---Decor: $2,000
Thursday, June 18, 2015
Full: Landscaping part 4: Drip Sprinklers
Our landscaper did an amazing job with our sprinklers, he installed a drip system around our house as well, in our flower beds. The back flower bed against the fence was a dripper hose with a hole every 12 in. However the rest were just a dropper pipe coming up out of the ground and I wanted to make it the way I wanted to! :D
Greatfully we did this in our last house and had alittle experience, so I kinda knew what I was doing.
Back track just a bit. Chris installed our sprinkler system


Greatfully we did this in our last house and had alittle experience, so I kinda knew what I was doing.
Back track just a bit. Chris installed our sprinkler system
Which made the process quite easy, since I could stand in the flower bed and turn on the sprinkler to make sure it was working well.
I got one of these and it was a perfect starting point. I started in the front flower bed. I really wanted to use these cute little sprayers
However they put off between 0-15 gph and were way too powerful :( So I changed to drip lines and tips.
I installed between .5-2 gph dripper for each plant or area directly from 1/2 in pipe using my handy dandy punch.
I added soker hose to the garden and a few other places where I felt it was needed.
NOW EVERYONE'S FAVORITE PART!
Money Breakdown
Sprinkler Main lines and 1/2 pipe and barbs: Included in landscaping cost
Rainbird starter bucket: $25
Punch: $10
Mis drippers, sprayers : $25 (some were unused but still kept)
Soaker hose : x2 $15
extra stakes for hose: $10
All things done: Out of pocket $100
Running Total: $9,068.00
---Landscaping: $8,040.00
---Plants and Flowers: $550.00
---Garden : $378.00
---Drip Sprinkler: $100
Wednesday, June 17, 2015
Full: Landscaping part 3: Garden
Once upon a time I thought that having a garden would save me money.. I WAS WRONG! :D



In my prior post about building a garden box I went thought the steps as to how I made the box. I decided to use starts for my garden this year for all except carrots because I was not so sure about seeds. After a lot of planning and talking we decided to plant the following items.
Tomatoes
Zucchini
Yellow Squash
Peppers
Lettuce
Onions
Garlic
Carrots
Raspberries
Herbs
Box 1

Box 2

Box 3

Box 4 & 5

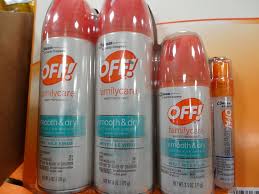
I started on our patio, We have TONS of misquotes in our area and they love me. I do anything and everything to keep them away, between Tiki Torches with Bite Fighter, at least one or two bottles of off and as many herbs that will keep them away.
I did lots of research and found some of the best Herbs for keeping misquotes away are
Lemon Grass
Cat Nip
Lavender
Mint
Sage
Thyme
Citronella
So I used some pots we got a few months ago for a killer deal ($10 each for awesome urns) and some others we already had and placed them on our patio and then added many more to garden boxes
I also got 2 raspberry bushes, I chose to go with THORN-LESS, Since we have a basketball hoop just off from where I want to put them, I don't want thorns in basketballs or in little boy's hands.

NOW EVERYONE'S FAVORITE PART!
Money Breakdown
Top Soil: included in landscape costs
Garden Boxes: Wood=$80, Screws=7, Stain= $30 --- $117
Urns: $20 (originally they would have been $45 each!)
BrazelBerries Raspberry Shortcake: WAY pricey Plant that i wanted to try out $ 30
Thorn-less Raspberry: $7
Box 1: Lettuce 4 types, Carrots, Onions -- $ 15
Box 2: Onions, Garlic, habanero peppers, jalapeno peppers. $15
Box 3: Tomatoes, 3 cherry, 1 early girl, 2 yellow, 1 big beef, 1 celebrity. $15
Box 4: yellow squash, zucchini, green peppers, red peppers, Anaheim peppers, mini bell peppers $20
Box 5: Lemon Basil, Basil, Lavender, chamomile, Rosemary, Cilantro, parsley, oregano. $25
Patio plants: $23
Mulch: 3 @ $7 -- $21
Fertilizer: $15
Tomato Gates and trellis: 10 @ $5.50 -- $55
All things done: Out of pocket $378
Running Total: $8,968.00
---Landscaping: $8,040.00
---Plants and Flowers: $550.00
---Garden : $378.00
Tuesday, June 16, 2015
Full: Landscaping part 2 : Plants and Flowers
Between all the fun with the landscaper and the costs there, we still had LOTS to do on our own.
I used landscaping fabric from Costco to lay at the base of the front flower bed and the back along the fence. For the back along the fence I used PINTREST to save me some $$$. My mother in law has a BEAUTIFUL yard and she allowed me to take some of the bulbs from her day lily's and hostas, I was nervous at first but so far they have worked out.
However, that was not the end. I have wanted a BEAUTIFUL Japaneses maple for a long time, and just before we sold our townhouse we got one, but left it with the house. I looked for a long time to find the PERFECT tree and landed on a Coral Bark Maple. It has beautiful color year round.


Those are some Professional Pics!
THIS IS MINE!!!!!!!!


She is small and still has alot of growth to make her strong but her name is LEAFY! Liam helped me name her!
I tried to keep things as cost effective as possible so I bought a bunch of bulbs. They are perennial and they sell for about $8 for a large bag. Everything I purchased are summer blooming.

Plants are anything BUT CHEAP!!! We have some beautiful nursery's around our home so we took advantage of what they have. I was NOT smart with this part, there was little to NO budget on this so I just kept getting stuff and it added up far faster then I would have liked.

I love snap dragons and ALWAYS try to get alot of them each year just to bring some fun color to my yard. I also decided to put above the rocks an annual flower bed so I have alittle to work on each year, but not the whole yard.
By the time I got to the back yard garden, I'd run out of money :( and I had purchased WAY too many annuals so I have 2 peony bushes and annuals between. (the end has raspberry buses, I'll include those with my garden post tomorrow.)

Money Breakdown
Landscape Fabric: 1 large roll: $15
Top Soil: included in landscape costs
Back flower bed against fence: Transplanted from in-laws yard, 1 perennial grass: $15
Back house flower bed: 2 peony bushes: $30
Front Flower beds: 4 bags of bulbs $40
Japaneses coral bark Maple Tree: $50
Lilac tree (mothers day present from Hubby): $100
Small red Japanese maple (mothers day present from inlaws): FREE (would have cost about $50)
Grasses, Annuals and miscellaneous other flowers: $230
Bags of Mulch: 7 @ 10 each: $70
All things done: Out of pocket $550
Running Total: $8,590.00
---Landscaping: $8,040.00
---Plants and Flowers: $550.00
May not sound like alot, but when I didn't budget for it and spent it, it added up QUICKLY!
Anyone else forget to budget and went alittle crazy in the yard?
Monday, June 15, 2015
Full: Landscaping part 1: Landscaper
IT'S YARD WEEK!!! We have finished all we can afford for 2015 but wanted to share all the nitty gritty details!
ENJOY!!
This spring we have spent the whole time working on our yard. You can see the first few steps thought, Planning, Bidding, Grass!!!???, We have Grass, and Garden. However today I want to go over what we have, and what we still plan to do this year. As well as a full cost break down. Please forgive me in advance this will be a SUPER LONG POST!
Full Disclosure: This is our forever house so we have chosen to do somethings "done right" expensive. Just to make sure we can maximize every $ so we don't have to fix it over and over!

This was our planning page. The green is grass and the yellow is drip system flower beds and Garden.

As always things don't always work out like we all want, but this was our landscapers FINAL break down.
Gate 2 5ft gates tan: $1,000
Edging; Curbing, stamped and colored: $570
Grading and Dirt: $1,125
Front Rocks: $550
Sprinklers: $3,100
Downspouts: $120
Grass, 2,500 sq feet Installed: $1,125
Extra load of top soil 4 tons: $125
Load of rocks 4 tons: $325
FINAL LANDSCAPING BILL : $8,040
OUCH!!!!
Welcome to buying a new house!

I had planned about 10k to do the whole yard. However have quickly learned. That's just not enough!
Anyone else start a project that ended up being WAY more expensive then planned?
Monday, June 8, 2015
garden and yard!
I'm starting to see the fruit of my labors! ( HEHE)


My beautiful raspberry bush.
We still need to add some mulch but I feel quite accomplished.
Chris also got some furdlizer on the yard, so hoping it will green up soon!
Thursday, June 4, 2015
Fertilizer? and first time yard
In our town house we never had to work in the yard. "We chose to do a few things." (patio pavers Which I will share with you this summer) However, I know pretty much NOTHING when it comes to a yard.
We just got our GRASS 2 months ago and there is still so much to learn.
When the grass was first installed I thought, ok hubby mows it and I forget about it..... It looked like this for a few months...

BUT NOW. It looks like this.

Not bad, but getting patchy and not sure what to do. This is when a very un educated yard person asks her father in law for help. I get to learn about fertilizer.
Growing up my dad always had someone take care of the yard so I NEVER even thought about it.
 WOW people are VERY opinionated and as they should be. I like to think of myself as somewhat green, (ie cloth diapers hippy here) but not perfect. I have learned ALOT.
This is my favorite description of what to use and why.

We just got our GRASS 2 months ago and there is still so much to learn.
When the grass was first installed I thought, ok hubby mows it and I forget about it..... It looked like this for a few months...
BUT NOW. It looks like this.
Not bad, but getting patchy and not sure what to do. This is when a very un educated yard person asks her father in law for help. I get to learn about fertilizer.
Growing up my dad always had someone take care of the yard so I NEVER even thought about it.
This is my favorite description of what to use and why.
That being said I will be using some Chemical Fertilizers this week to give my grass some MUCH needed food and hoping to get the spots less splotchy and beautiful green!
I totally LOVE Home Depot, that is MY hardware store! :D I'm planning to stop by there tonight after work and pick this up!


For the Grass and

For my Garden! I hope to get some mulch next week and the yard will be :S DONE?
What are you doing in your yard to get it up and ready for summer.
I totally LOVE Home Depot, that is MY hardware store! :D I'm planning to stop by there tonight after work and pick this up!

For the Grass and
For my Garden! I hope to get some mulch next week and the yard will be :S DONE?
What are you doing in your yard to get it up and ready for summer.
Thursday, May 28, 2015
Garden boxes
I have a thumb! ;) actually I have 2 of them!! "SHOCK?!" Lol well at the moment they are a mix between peach and white colored. My goal is to turn them green!! :) we will see if that happens. In our last home we were able to successfully plant and grow some tomatoes and a whole bunch of herbs. Now that we have our house it's time to try again.

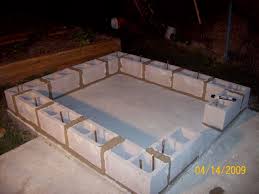
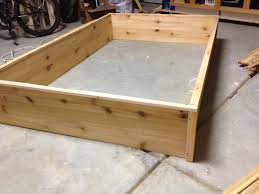
#1: DIY build your own (wood & stone), #2: buy them, and a few others!

I chose to use Home Depot links, they are the closest hard ware store to my house and have the best prices! I am in NO WAY associated or compensated for my ideas or materials!


This is our old house Garden!
Once we do step 2 of our yard next year (pavers and waterfall) We plan to do this, but for now I need Cheap!
I researched for weeks trying to decide what to use for our boxes. We have a lot of long term plans for our yard, but for now we need something. Cheap.
I went through many choices, and thanks to Pinterest who took my 2 ideas and gave me 100+.
I started with our size. We have 10ft between our house and property line, so not a lot to work with, but enough to make the space requiring a lot of time and energy.
My first idea was 16ft long 4 ft wide by 24 in deep. On the "property side" and 2-2x4 boxes next to the house.
During my search I learned some really important things. Wood is Expensive! (Common it grows ok trees!)
My first choice was a beautiful 2x12x8,which I soon learned costs $12 each. So for my garden we were looking at a simple 16 boards putting us at $200 in wood!' OUCH!! Gardening isn't cheap!!!
Next we moved to cinder blocks, which would be fine, but each one weighs about 25 lbs and we would only need about 100 of those. Suddenly 2500 lbs of moving and still at about $170 didn't sound too nice.
#1: DIY build your own (wood & stone), #2: buy them, and a few others!
Here are my ideas and costs
Cinder Blocks => 4.6 ft x 18 ft x 8 in 16" x 8" x 8" 34 of them = approx $63
Wood; => 3 ft x 18 ft x 10 in 5/8" x 5 1/2" x 6' 16 of them: approx $48 (ours ended up costing alot more then this, HOWEVER still the best option, since I did more then originally planed)
Prebuilt => 4 ft x 8 ft x 8 in BOX = 51.50 (half size of others) or 4 ft x 16 ft x 8 in = $103
Prebuilt => 4 ft x 8 ft x 8 in BOX = 51.50 (half size of others) or 4 ft x 16 ft x 8 in = $103
I decided after a lot of time searching and planning, simple cedar wood was the most cost effective and best suited for our garden for now. We need it to last just a few years so seemed like the best option. And the idea of a 6'x5"x1" (approx) at $2.50 was great.
I decided to start with some and work from there. I took the 6' peice and cut it in half for the sides, so a bit smaller then planned.


Here is what I bought. It took a few days planning, buying, building, and re buying and building.
I made 3 smaller ones and put them all together. I
used
2- 2x2x8
1 box:dry wall screws
-cut 4 (5 ½ in) of them in half at the 3ft mark.
-cut 1 (3 ½ in)in half
-cut 4 (2x2) into 1 ft pieces
-cut 8 (2x2) into 8 in pieces
I chose to put all 3 parts together. And stacked the 5
½ in boards on top to make the two sides 10in and the middle piece 13 in.
I also decided to use a spray sealer that is safe for food.
I chose to use Home Depot links, they are the closest hard ware store to my house and have the best prices! I am in NO WAY associated or compensated for my ideas or materials!
Subscribe to:
Posts (Atom)